
The following are a few of the settings I use on my z9 and my son Kevin uses on his z8. I have them here not as a set of rules but as a place to start. You take them and modify to fit the way you shoot.
A couple more notes on my shooting. I'll be eighty in April and have been shooting Nikon since 1960. Today I'll be shooting the z9 combined with the Nikon 180/600 mm lens. The first day of shooting that's not too heavy but by the second day or even the end of the Rolex shooting they weigh about fifty pounds. I use a monopod to help smooth out my pans as the days move along.
I also use a polarizing filter to clear window glare.
I do not do travelog shooting of Laguna. I know the track and it's turns from years of shooting. I know my favorite turns for the time of day. I match the time of day to the group run time and then pick the turn. I may spend the morning in turn eleven for those nose to tail images or those images where the driver is illuminated with side lite for just a fraction of a second. For those interested outside turn eleven takes 200mm minimum for nose to tail images. For motion side images 24 or 28mm will do. Inside turn eleven is a kick. You will be just a few inches from the cars and the wider lenses work well. But keep your eyes open and don't get run over.
Note: From 11am to 3pm spend your time in the paddock. Laguna's light is rather lacking for on track images during this hours.
Pick a turn-learn the turn-watch the light come to you - let the cars come to you.
Setting up your z9 or z8.
Custom Settings Bank
c. Timers/AE Lock
c1 Shutter - Release button AE-L OFF. This allows the use of the AF-On button on the back top right of the camera body to focus us the camera. NOT the shutter release button.
d. Shooting display
a1 Continuous shooting speed. Continuous high-speed 20FPS
a2 Maxim shots per burst 40
a3 Limit release mode selections Single Frame and Continuous High
d9 File number sequence ON
d10 View Mode (photo Lv) Show effects of settings.
d14 View all in continuous mode ON
a. Focus
AF-C Priority Selection. Set to Release
Focus Tracking with Lock On. Set to 3 to 4. If your focus is getting stuck and not jumping to your next subject try a shorter delay. If your focus is bouncing off your subject go for a longer delay.
Subject Motion. Set to Steady. This choice is set for a subject that is prone to sudden stops and starts not left right or up an down motion.
a7 Focus point persistence. Set to Auto.
a15 Manual Focus Ring In AF Mode. Used with z series lenses. Set to ON
Subject Detection set to Vehicle. You can tell in 3D when Subject Detection is working as the Green Focus Box gets smaller. You may want to experiment with Face and Bird in 3D. If your Subject detection is not working for your subject turn it off or try another setting. I have had good results with Face and Bird in 3D. Bird seems to work well for the open face helmet clear shield no sun glasses subject. In 3D the subject focus box will change size to match the size of your focus point. As the drivers face get closer the green box will focus in on his/her eyes with the green box getting smaller.
If your face detection green box keeps losing focus turn subject detection off. Use the 3D Green Box to focus. Put the green box on the driver and pan through your shot. Your panning skills relate exactly to how successful your follow focus system will work.
Set your AF Mode and AF Areas.
Set to AF-C mode. This allows the z8/9 to pick up a focus point then follow it through your pan. It may be helpful if you pre-focus your lens to the distance/area you plan of picking up your subject. That way the 3D-Vehicle does not need to search out the subject. You pan the subject into your frame and start 3D-Automotive follow focus once the driver is in the pre Focused area.
Set ISO to Auto with a max of 3200.
Set shutter speed and f stop to manual. You pick the shutter speed and f stop you want and let the camera pick the ISO. Once you have captured your “sharp” image start to drop the shutter speed.
Shutter speed. Start high speed 1/500 second for two or three laps. Go slower on the following laps.
Customize the " i " menu.
AF-area mode/subj. detection.
Vibration Reduction
Focus Tracking with Lock-On.
MeteringMonitor/Viewfinder Brightness
Focus Mode
These are the settings I use in the " i " Menu. That leaves seven boxes to be used as Nikon brings other features onto the z8 - z9.
Burst shooting.
This is a new area for me. I have always believed the sign of a good sports photographer was his/her ability to capture the peak moment of action in each frame of a given action. How ever with burst group shooting the z8-z9 allows you to capture multiple moments of peak action in each action. For instance a 906 going through turn eleven with another car close behind. A burst exposure gives you the choice of capturing not only the best view of the driver but also the following car, the front wheels bouncing over the curb, rocks being thrown back at the following car, and both left and right sides of the hero yellow car. Another example. A group of five or six formula cars going through turn two. I am focused on the third driver back. With a burst group exposure I can get all six drivers moving about the frame while I keep my Hero driver in focus.
The more frames per second the more opportunities to capture Hero images.
Set the frame rate to 20 frames per second.
Using the Release Mode wheel - that's the wheel on top of the camera far left. Hold the Lock Button down. The Lock Button is 11 o'clock to the Mode wheel. Rotate the wheel to Continuous low-speed. Low speed - 1 to 10 frames per second.
Continuous high-speed. High speed - 10 to 20 frames per second.
Set to Continuous High Speed.
Custom Settings Menu
D Shooting Display d1 Continuous high speed to 20fps
d2 Maximum shots per burst 40f
d3 Limit release mode selection. Continues H
d8 Limit Selectable Image Area set to FX (36x24)
d9 File Number Sequence ON
d10 View Mode Show effects of settings
d14 On
d15 Image Frame ON
d17 Grid Type 3x3
d18 Virtual Horizon Type A
These are a few of the settings I use on the z9 and Kevin uses on the z8. I suggest them only as a starting point. After the first day of shooting grab a bottle of good red go back to your hotel room down load your images and start reviewing them. . If you use the burst method of shooting do not be surprised if you return with six or seven thousand or more images.
During the day keep notes on your shooting. Use these notes to quickly find the hero images to review go over them and see how you can modify your camera settings and your technique for the second day.
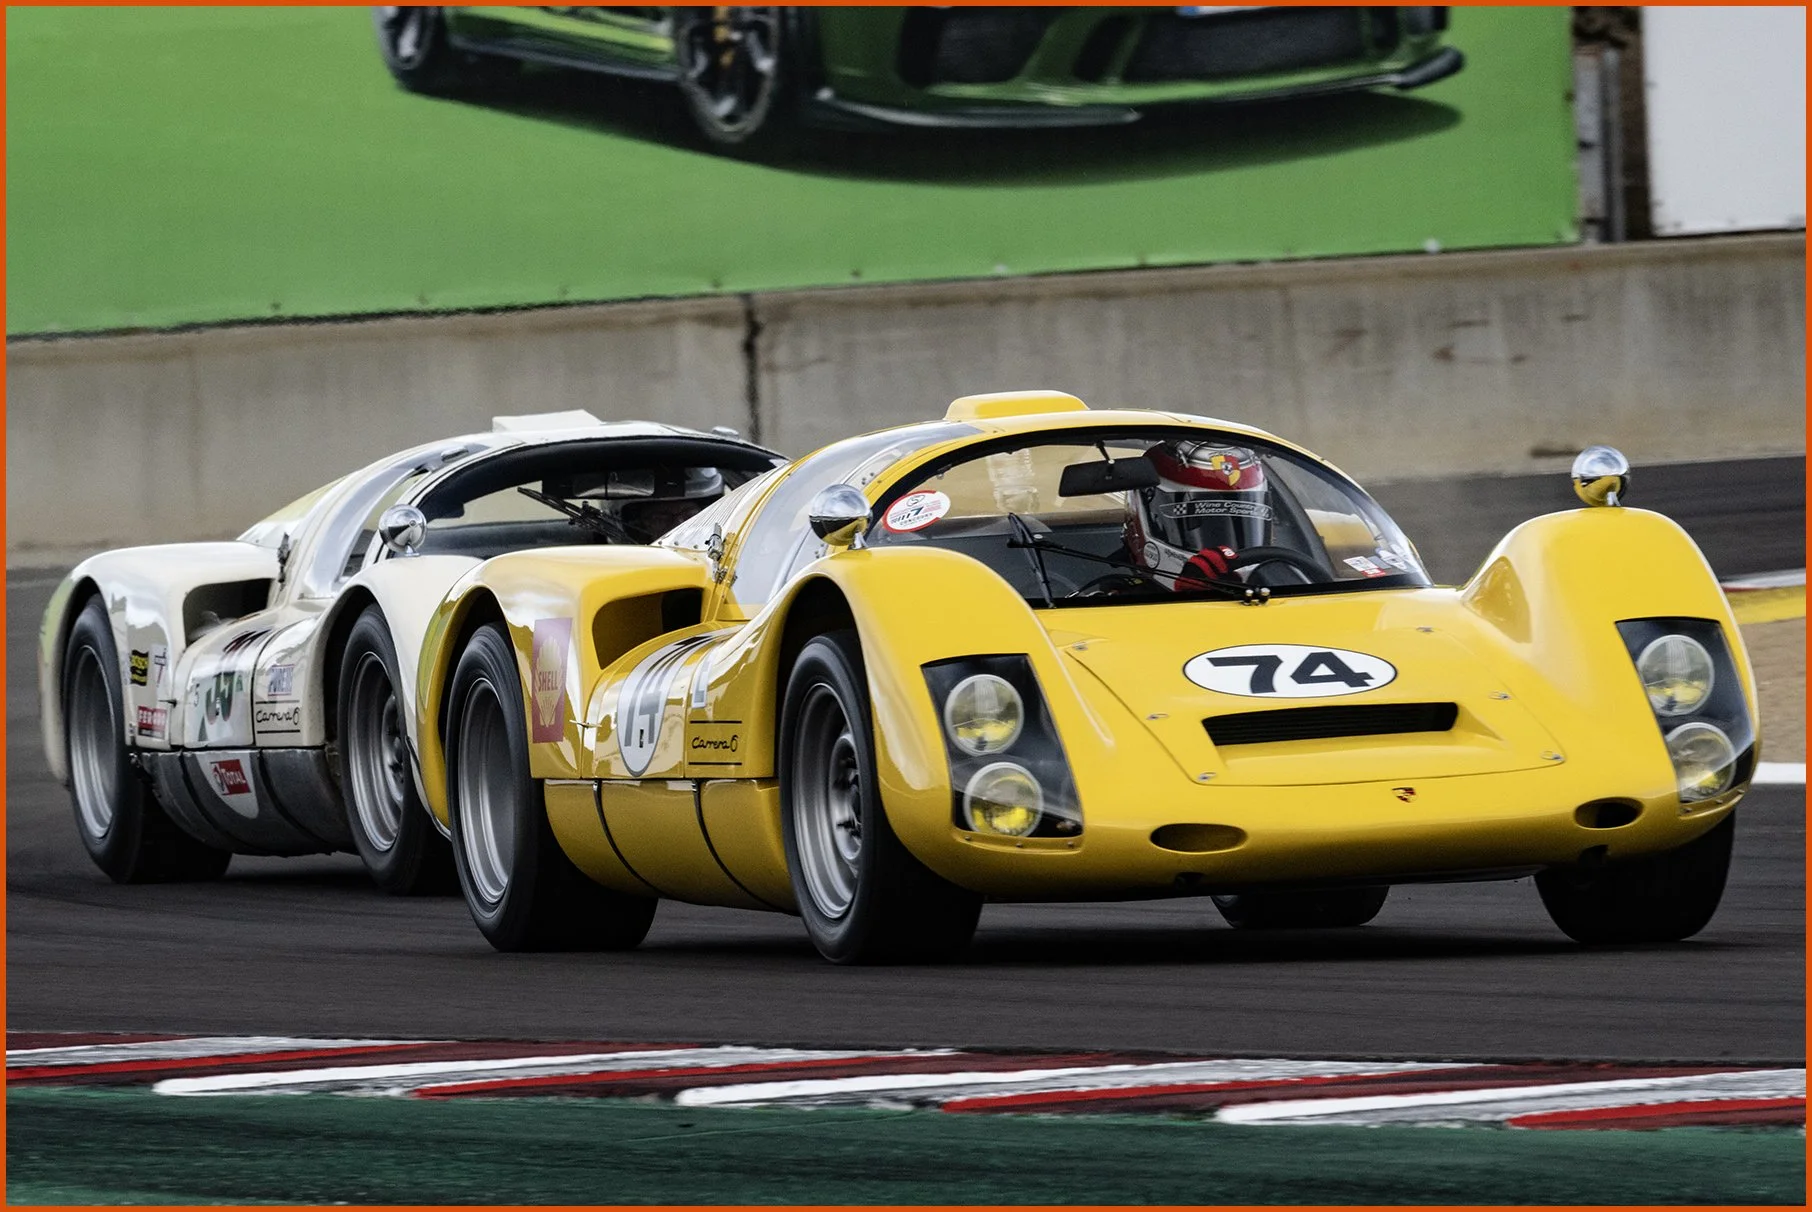
File information on the yellow 906 images.
Overcast. Soft shadows and highlights.
Z9 Nikon
Nikkor Z 180-600mm f/5.6-6.3
Racked out to 400mm, f/16 at 1/250 second.
Burst at 20 frames per second, 3D set to Bird id.
Each image is cropped for impact. Please note the focus held on the drivers helmet from image 7411 to image 7434. That’s a total of twenty three (23) images that the z9 held focus on the drivers helmet. Better then I could do pushing the shutter button.
Click on the image to see larger version


Another sample of Burst shooting.
z9 Nikon
Nikkor Z 180-600mm racked out to 180mm f/22 at 1/160 second on a monopod with polarizing filter. This series ran from frame 9234 to 9240. Again I was using 3D follow focus with Bird recognition. They have all been cropped. The second version of frame 9237 is cropped simerly to the version I printed. These are also an example of letting the light and the cars come to you. Earlier in the day the light would not have been as interesting. Then of course it’s the second car lit by the setting sun that ads visual impact.
Click on the image to see larger version


